How can we help you?
Till Setup
2 min read
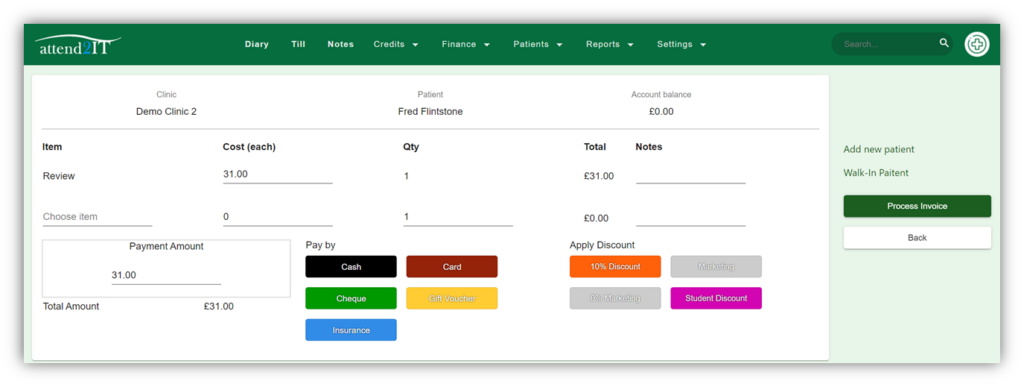
Clinic ID: Select clinic ID here (if using multiple clinics)
Select Patient: Select Patient here. You can use “walk in patient” for simple stock sales
Process: Complete the transaction by pressing this button
Item Picker: Select Items from the drop down here, appointments will auto fill.
Take Payment: Select Payment amount and type here.
Discount: Apply any discounts to the transaction here.

Using the Till #
•Having selected take payment on the appointment menu, you will be taken to the till page. You can also access the till from the top menu.
•To take payment, confirm the item and item cost are correct, and that the amount is correct in the payment amount box.
•To take payment from a single payment type, select the payment type (cash, card, etc). This will update the Total Amount columns and should leave the amount remaining as £0.00.
•To split transactions across multiple payment types, change the amount in payment amount and click on the type of payment you wish to apply that amount to. Eg: £20 cash, £20 card.


•To apply discount to the transaction, just click on the discount type you wish to apply.
•To remove a payment/discount line simply click on the ‘–’ next to the line item in the total amount table.
•You will be presented with a warning at the top of the screen in a red box if the patient has any outstanding balance on their account. You can choose to add these items to the current transaction by clicking on yes, or leave them unpaid by clicking no.
•To complete the transaction, click on Process Invoice.
Generating X/Z reports #
To generate X/Z reports go to the Finance menu and select XZ Reports

This will take you to the open tills. From this screen you can click buttons to generate X or Z reports.

To generate the report, click on the report button.

Once generated use the print button on the right to print the report and the continue button to return to the open tills.

